The cell blocks of Nova Prospekt will be the longest Gordon Freeman has spent inside in the whole of Half-Life 2, the ninety degree turns and tiled floors recalling the Black Mesa Research Facility explored in the original Half-Life. These areas also see the return of familiar elements from that game: laser tripmines and automated sentry guns.
The initial areas of Nova Prospekt are largely deserted, there are scattered encounters with headcrabs and a small nest of barnacles, but your primary concern is simply finding a way deeper into the prison. Here you will get your first glimpse of the Combine’s automated sentry guns. Initially seen on the other side of locked gates, they attack, and are subsequently attacked by, antlions. Witnessing these fights from a safe distance trains you in their strengths and weaknesses. Lessons that are put to the test during a confrontation with a pair of them as you leave cell block A5.
“Incursion warning. Airwatch reports probable Anticitizen Freeman reacquired zone Nova Prospekt. Ground units deprioritize exogen containment. Hold for override codes.”
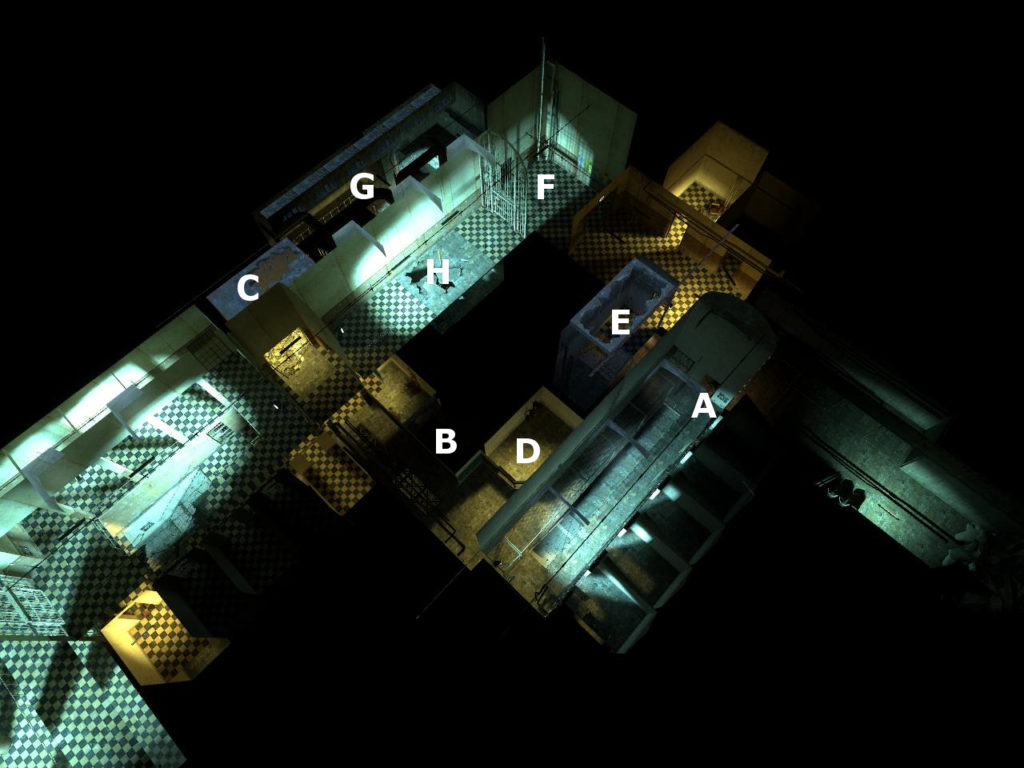
With the roof collapsing behind you the only way on is through the door (A) into cell block A3. The entire right side of this space is cordoned off behind a fence. A set of metal steps leads down to the lower level where one of the cells is open, a hole in the back wall (B) leads through to an empty security office.
Outside the corridor runs past a locked gate – beyond which a sentry gun can be seen firing at a hole in the far wall. The corridor you are in continues to the right where a doorway opens into a stairwell (C). You come out on the far side of the fence bisecting cell block A3.
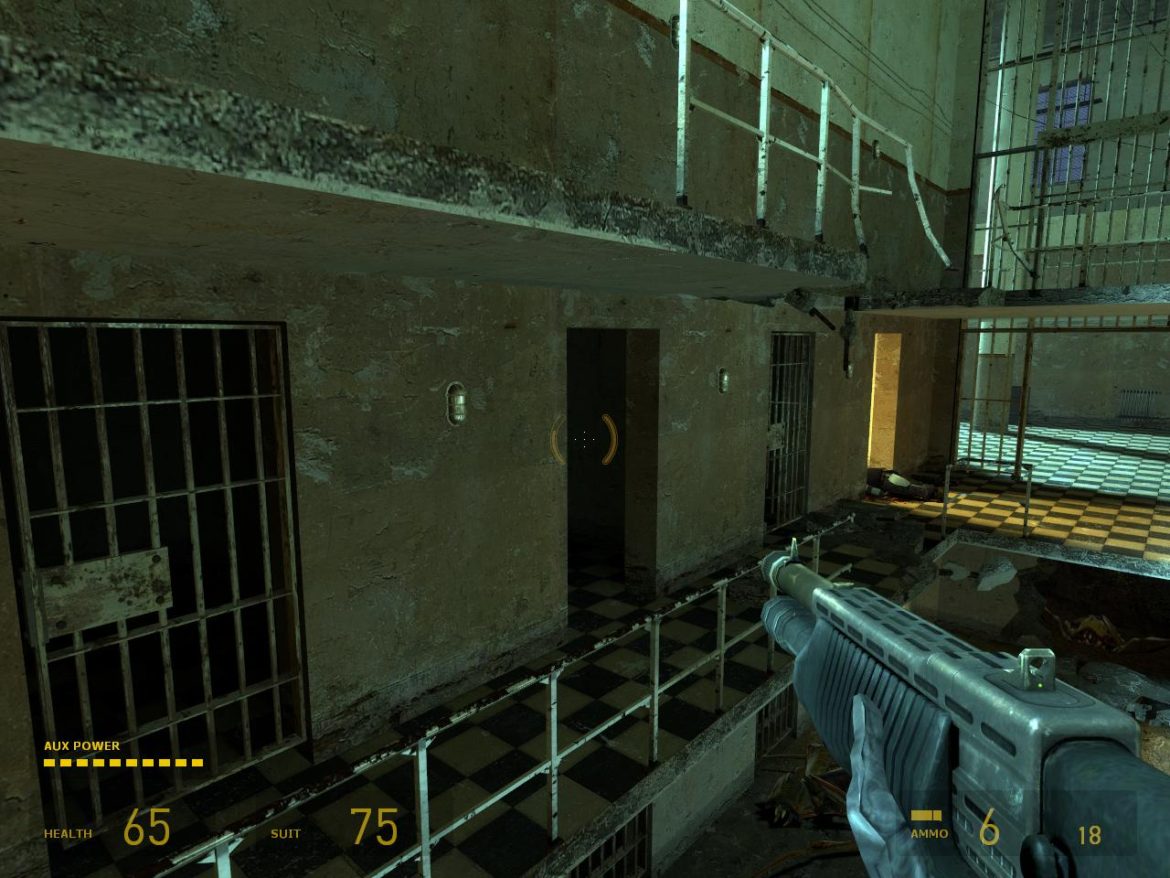
Through a door, out of the darkness, your first sight of the interior of Nova Prospekt is the flaking paint and rusting metal of cell block A3. A row of cells stands empty to your left, in addition to their barred inner doors each cell has an individual outer door of solid metal. Some of these outer doors are sealed shut – the contents of the cells to never again see the light of day – others hang from their frames or leaning impotently against the wall having come away completely.
The right side of the room is partitioned off by metal fencing, an empty security room can be seen beyond. A dull red splatter on the reinforced glass an indication that something happened here, though it’s difficult to determine when.
- A corner room with a single door and three angled windows of reinforced glass. Nothing about these rooms explicitly labels them as a security office though their form speaks to their function: secured rooms from which to observe the cell blocks and corridors of Nova Prospekt. The function of rooms within Nova Prospekt (and Half-Life 2 as a whole) is – unless their role is otherwise specified – determined by their contents. Small rooms with desks and filing cabinets are treated as offices. Any changes from that basic assumed functionality are detailed and examined. In the case of the security offices, Alyx does at one point in ‘Entanglement’ refer to them as such. The same is not true of certain other spaces within Nova Prospekt however, here I have assumed a room’s functionality based on form, context, and contents.
In the centre of cell block A3, between the row of cells and the fenced partition, a flight of metal stairs descends into the gloom. The upper level overhangs the space below, casting everything to either side of the stairs in shadow.
With one exception the cells here appear untouched, their inner doors shut tight and their outer doors either firmly secured or slid aside to reveal the empty cells. Behind and to your left as you descend the stairs – beneath the fencing above – one of the cell doors is wide open, warm orange light spilling from within. A ragged hole has been made in the thick concrete rear wall of the cell. Blasted or carved through several feet of stone, it opens onto an abandoned security office. A lone headcrab crawls around inside the hole. Liable to pounce as you approach, this sudden scare serves to indicate that despite appearances there is still some hostile life in this section of Nova Prospekt.
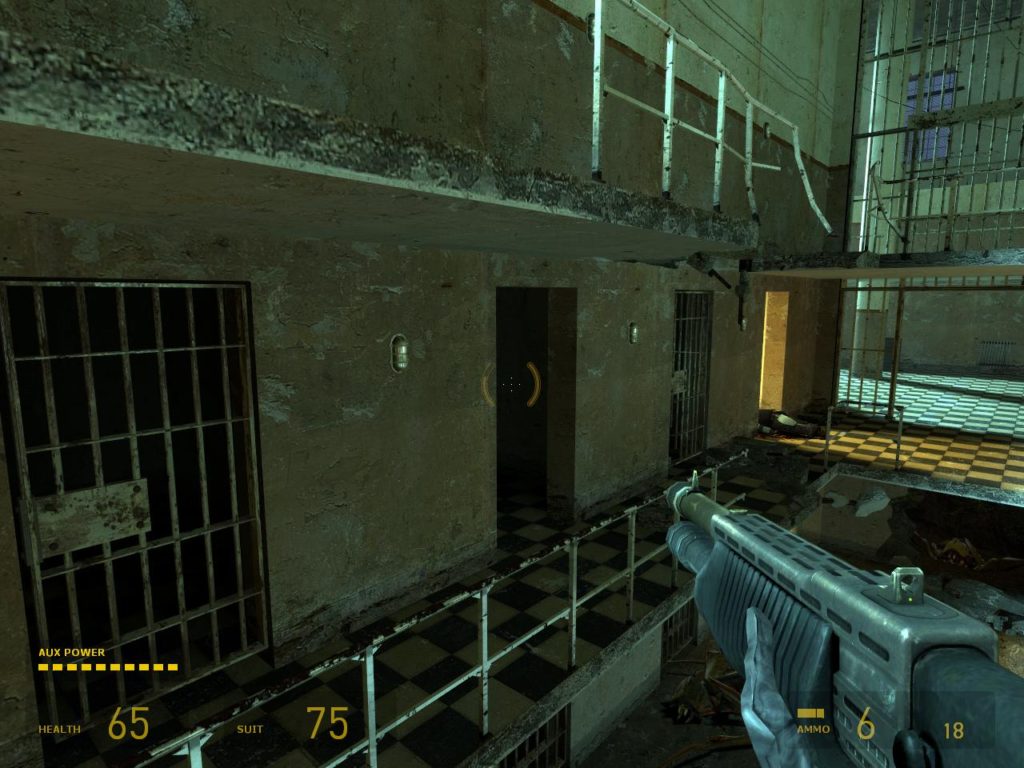
Dull red smears of blood streak the walls and floor of the security office, the bodies of two Combine soldiers lie within. Out of the security office, to your immediate left a faded stencil on the wall proclaims this area as cell block A5. To the left the corridor dead ends. Overhead, grating in the ceiling forms the floor of the corridor above.
Metal gates to the cells of block A5 are sealed shut. On the other side a lone sentry gun stands watch over a hole in the far wall, firing sporadically at the antlions that emerge from its depths. If you wait here you can observe their behaviour, though a better example can be seen on the floor above.
- This is the first time you will have seen the Combine sentry guns. Their look and functionality is similarly to those placed throughout the Black Mesa complex by the military during the events of Half-Life. Where those were static and triggered by visible laser tripwires these sentry guns are physics objects, and operate via motion sensors.
Past the gates an exit sign points toward a dimly lit stairwell. The floors of cell block A5 are visible from the stairs but fenced off, the landings between each flight offset from the floors of the cell block so that even without the fencing there would be no way to move between them. Despite being labelled as an ‘exit’ the stairs lead nowhere. The fencing is buckled and broken on the second landing, creating a small gap that offers a way out onto the floor above.
Another sealed gate to your right obstructs entry to the cells of block A5. On the other side a pair of sentry guns stand overlooking the multi-level space, allowing you to study their behaviour. If you keep watching antlions will eventually swarm them, knocking them over and causing them to deactivate. Without putting you in direct confrontation with them, these brief glimpses of the sentry guns at work serve to highlight key aspects of their behaviour: they are motion sensitive; they will fire on threats ahead of them; they can be disabled by being knocked over. Knowledge of these aspects of sentry gun behaviour will prove useful both within this chapter, where they are a direct threat, and in the subsequent chapter where you will have the opportunity to deploy them yourself.
Along with providing a teaching opportunity, being able to witness the sentry guns in action serves to make the world seem larger. You helped the antlions breach the perimeter and these are just some of the consequences, the things you are doing have an impact on the world beyond what immediately affects you.
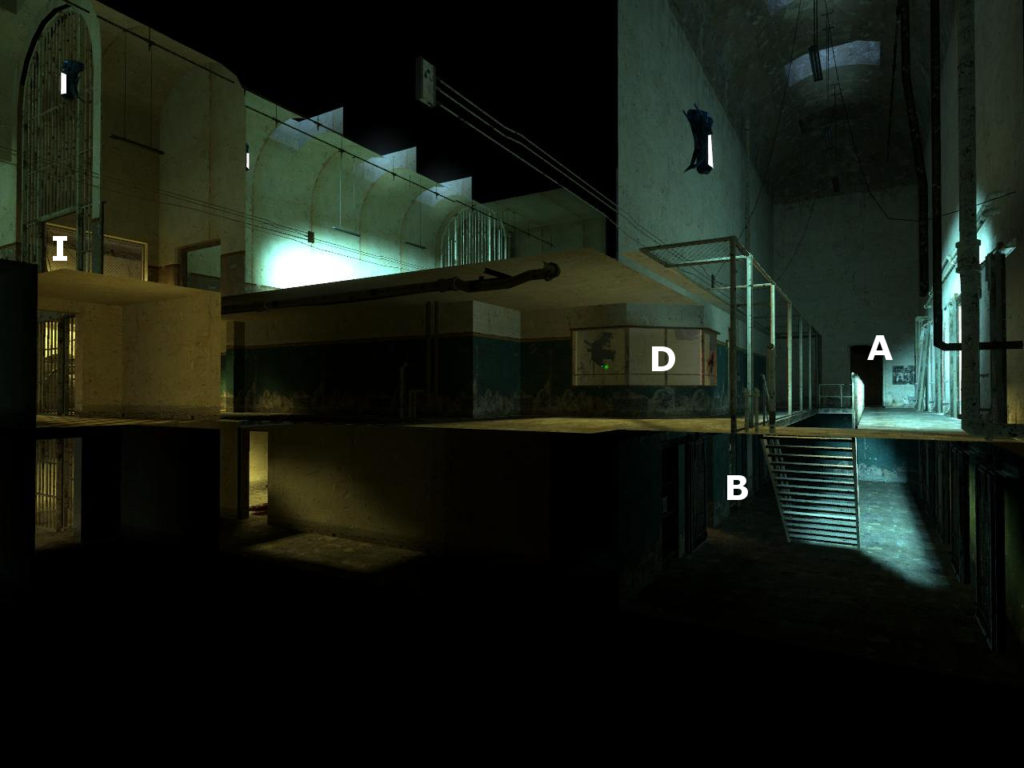
Moving back towards cell block A3 a security office (D) overlooks the corner. Now on the other side of the fence from where you started a door in the back corner of the room leads to a further stairwell (E).
Continuing past this gate you walk over the grating the formed the ceiling of the corridor you were in below. Ahead is the fence partitioning off one side of cell block A3, you have completed a loop and are now next to the security office first seen when you entered this area (D).
Inside the security office you can see that the stain on the window was caused by the dead Combine soldier within. Opposite their slumped corpse a security monitor hanging from the ceiling is still active, using it you can observe scenes from nearby parts of the prison complex: antlions attacking Combine soldiers and sentry guns; a hidden cache of supplies somewhere behind a door; Combine soldiers in a losing battle with an antlion guard (this last sequence only visible if you cycle through all available views and spend more than a few seconds watching events unfold). All these scenes are of locations you will visit over the course of the next few minutes, foreshadowing threats and secrets to come.
To the left of the monitor are a pair of charging stations for health and HEV suit energy.
Back out into cell block A3, warm yellow light highlights the doorway near the rear wall, beyond is another dimly lit stairwell ascending to a wide deserted hallway.
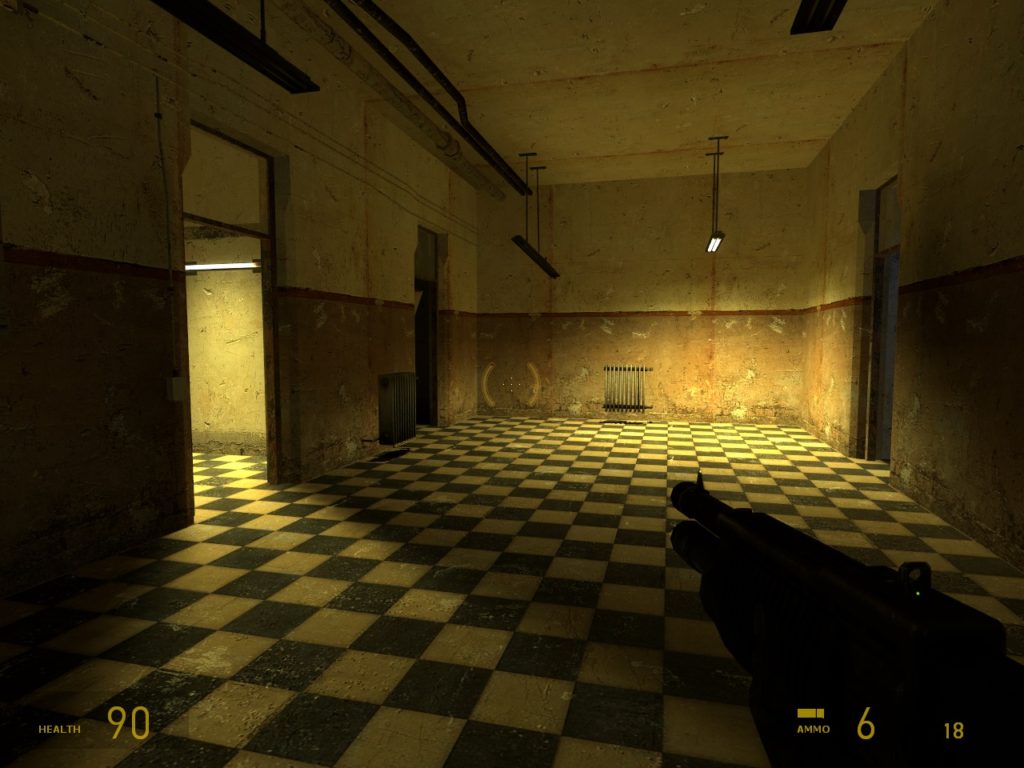
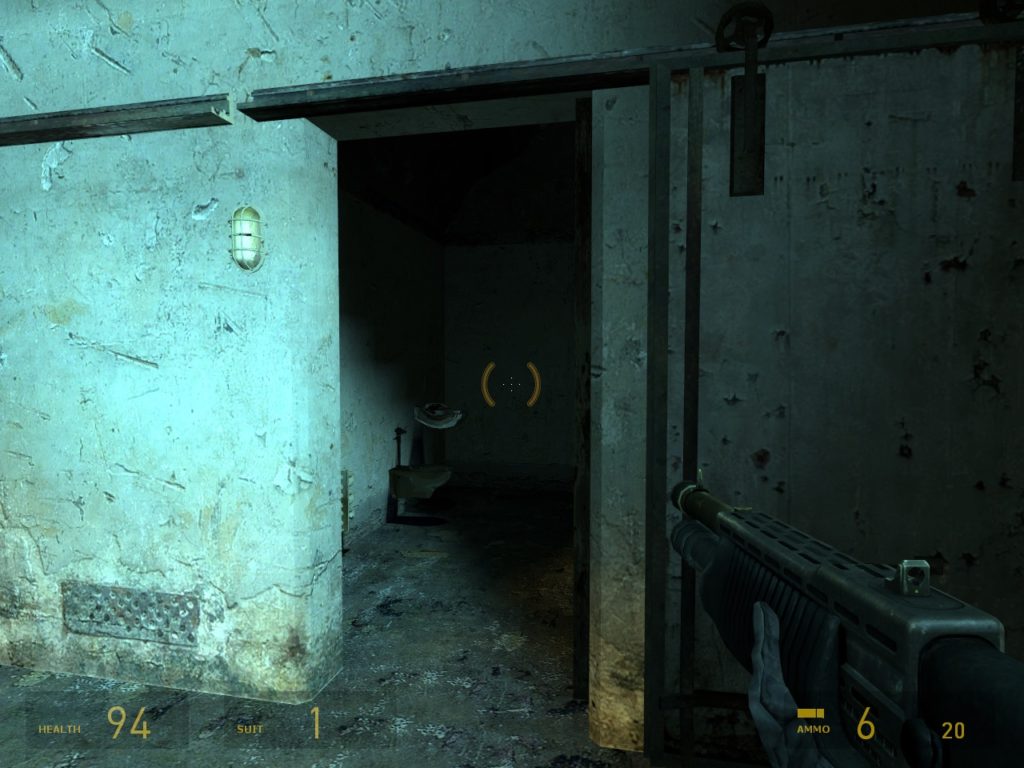
Opposite the stairwell are two small rooms. The door directly ahead has come off its hinges and now leans against the frame; you can push it aside and enter the darkened room to find a supply crate. The adjacent room is open, an empty chair stands within, it looks like some manner of dentist’s chair though its use is likely far less curative.
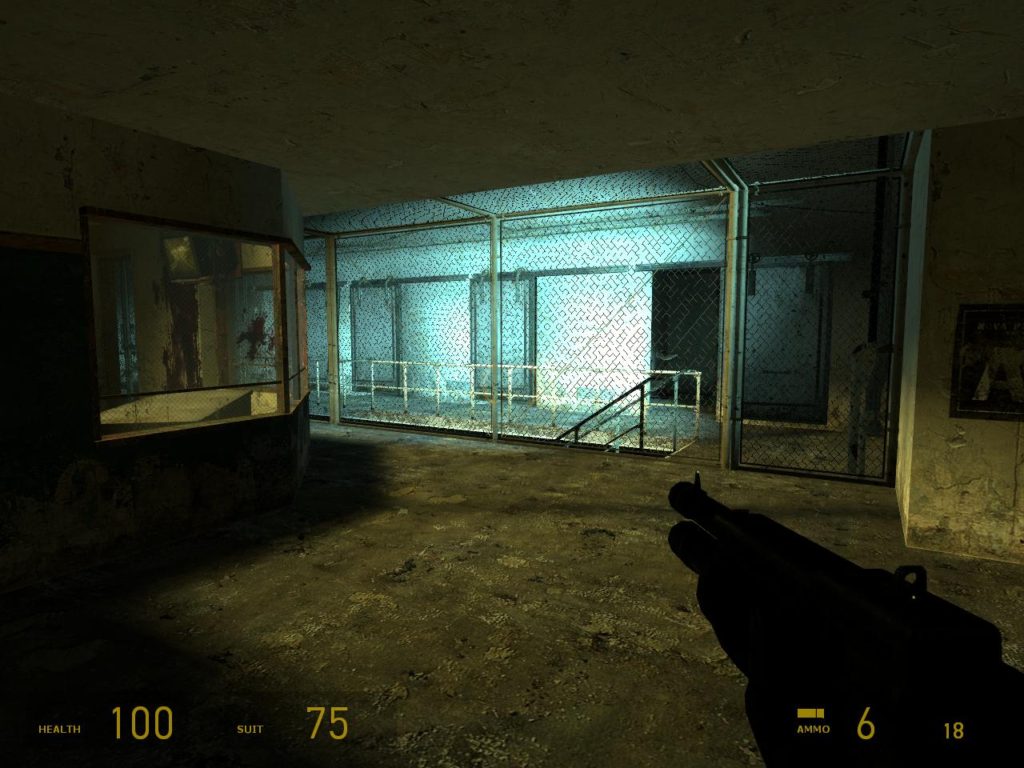
Turning left as you exit the stairwell (E) two sentry guns stand at the corner (F) watching over the corridor, and the hole in the floor (H). Behind them a door leads into the partially flooded utility space (G).
Down the ladder into the water, barnacles hang from the roof, their tongues blocking your way into the room beneath the hole (H). Climbing the rubble back into the corridor, the sentry guns (F) will open fire if they are still active. Now on the far side of the gate you can continue forward through the double doors and into the upper level of cell block A5 (I).
At the end of this hallway stand a pair of sentry guns. Facing away from you, they are guarding a locked gate and the short stretch of hallway beyond. There’s a hole in the floor on the far side of the gate, though nothing has emerged, yet. You can walk behind these sentry guns and through a door in the wall beyond. A safer option is to use explosives or physics objects – like the radiators in the hallway – to knock them over and deactivate them. Your first direct encounter with sentry guns, their position is such that they don’t yet pose a threat, you have the opportunity to deactivate them before continuing forward.
Through the door beyond you enter a utility space (G). Full of pipes and storage tanks the room is now partially-flooded; boxes and other detritus floating above the floor in murky chest high water. Entering this space near the ceiling metal stairs lead down to a dry upper level, where a ladder descends into the water.
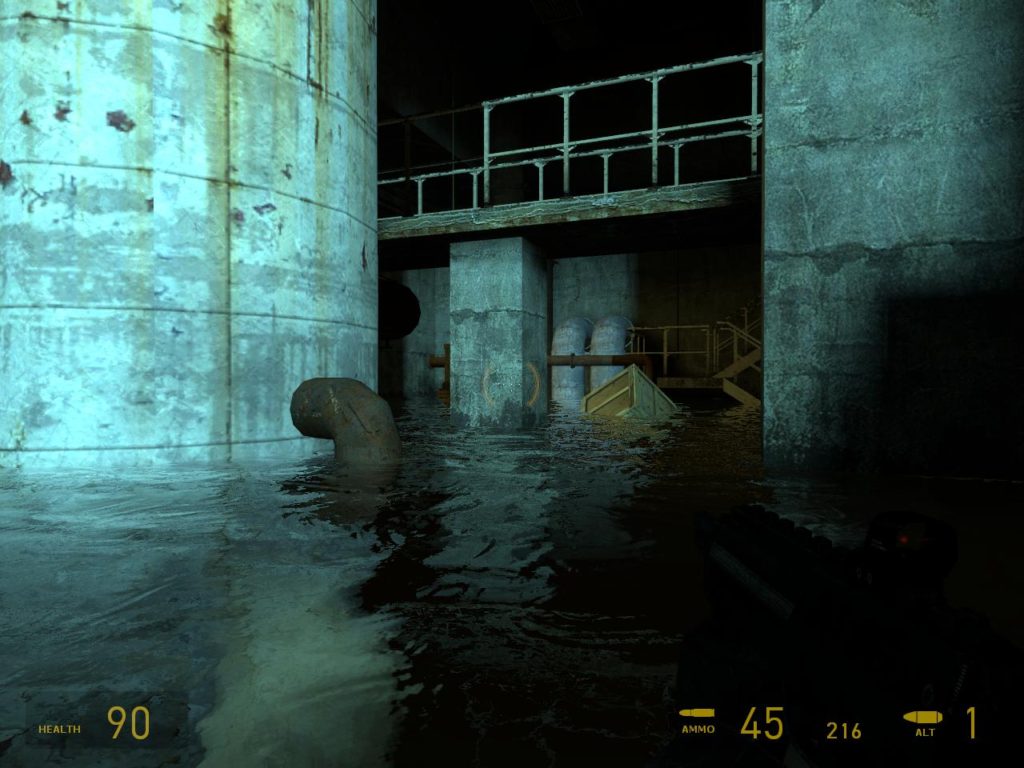
With the room lit primarily by the cold blue grey of a Combine light in the corner, the ceiling remains in shadow, partially concealing the barnacles latched onto it. There are three of the creatures in this room nestled between the pipes and ventilation ducts. Only one can be seen – and shot – from the safety of the upper level, the others are only visible once you’ve entered the water and are able to move further into the room.
There are steps against the far wall, a raised walkway clings to the corner of the room before looping back, forming a bridge over the water. The final two barnacles are hanging over the stairs up to this walkway, and the middle of the bridge itself. The doorway at the far end leads to a small square space into which the ceiling has collapsed, this is the hole you saw in the hallway above (H).
- Barnacles first appeared in Half-Life. Static creatures, they attach themselves to ceilings in darkened areas letting their long tongues extend down to hang several feet above the ground. Anything that touches the tongue is grabbed and pulled up into the jaws of the barnacle above. Unable to discriminate between organic and inorganic material, they can be tricked into grabbing explosive barrels or other physics objects.Hanging silently from the ceiling, only their thin tongues visible, barnacles make perfect traps. If spotted they can quickly be killed, and even if grabbed you can usually inflict enough damage to kill them before their maw closes around you. But where there is one there are others. Spotting a tongue, or the body of a barnacle itself, is a sign to be slow down and careful.
If the sentry guns are still standing they will attack as you climb up the rubble and through the hole. This incoming fire from behind encourages you to move forward toward the double doors at the end of the short hallway. Even if the sentry guns have been disabled, moving toward the doors will cause masonry and glass to fall from the roof, four fast headcrabs smashing through the skylight and down onto you.
You can make a run for it through the double doors, shutting them behind you and leaving the headcrabs on the other side, potentially to be gunned down by the sentry guns if they are still active.
Through the double doors (I) you can look down into the lower levels of cell block A5.
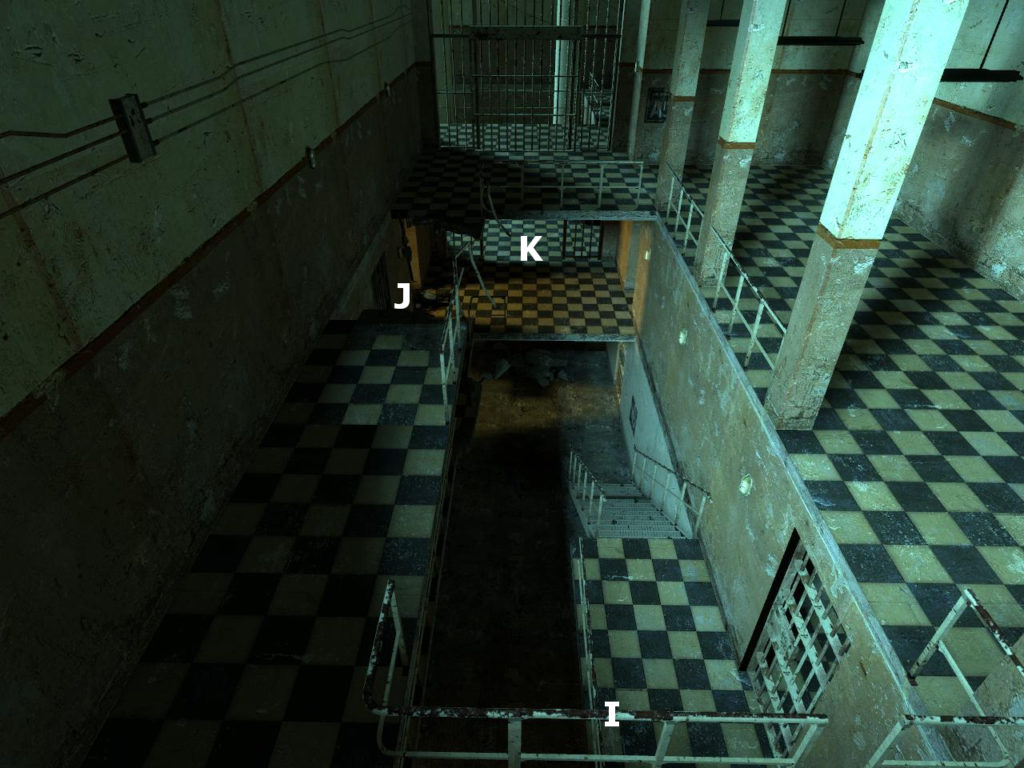
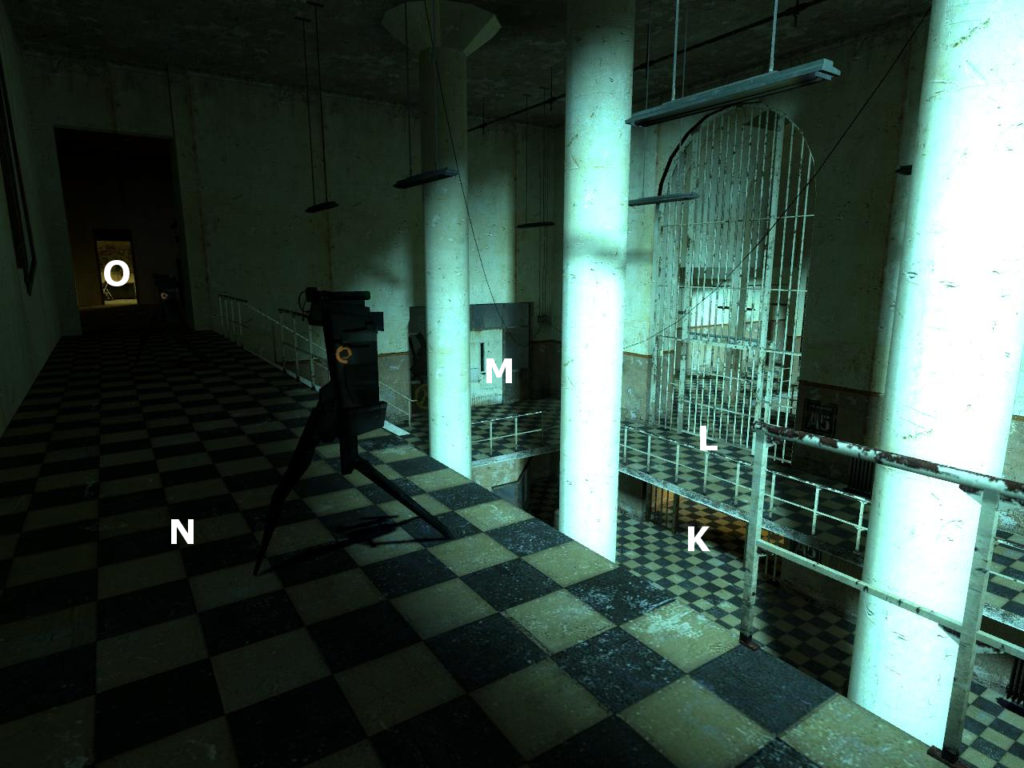
Though the gate on this floor is locked part of the walkway has collapsed (J), you can drop down to the floor below and exit the cell block through the open gates (K).
On the other side is a large space with an empty security office in the right corner and stairs to the left. Ascending the stairs to the upper floor (L), you will take fire from the sentry guns above (N).
The door here (M) is closed, though the adjacent window is boarded over and a Lambda Cache can be found on the far side. Continuing up the stairs, the way on is at the end of the hallway to your right (O).
The double doors open onto the top floor of cell block A5, an observation area built above the cells below; a hole in the centre of the floor allows you to look down into the main cell block. To your left beyond the buckled fencing is the “stairwell to nowhere” (C) that you explored earlier.
Ahead, rusting metal bars extend from the floor to the arched ceiling; the gate built into them sealed shut. On the other side you can see a large room, a pair of sentry guns occupy an elevated position against the far wall, monitoring the area between them and the exit from cell block A5.
Against the left wall a portion of the floor has collapsed (J). Drop down here and you’ll find yourself where two sentry guns once stood, in front of the sealed gates to cell block A3. A set of metal stairs descend to the ground floor where the lone sentry gun was first seen pointing at the breach in the wall, one of many through which antlions have now begun to swarm.
Ahead the gate further into Nova Prospekt is open.
Through the open gate out of cell block A5 (K), you enter a space littered with physics objects: barrels strewn across the floor, and radiators attached to walls. Cylindrical columns support the roof, casting long shadows at slanted angles across the checkerboard tiles. The floor above overhangs, providing cover from the sentry guns underneath the windows on the top floor.
- While pillars and columns can be used to partition space, their shape serves to modulate the sense of permeability that separation has. Square pillars create rigid lines that divides one space from another. Columns lack the perpendicular edges necessary to create a clear spatial divide and serve more to break up a space than to divide it into discrete sub-spaces.
Metal stairs to the left lead upward, but ascending will bring you into range of those sentry guns.
If you stay on the lower floor you can use the overhanging roof, columns, and security office for protection while you deal with the sentry guns. The scattered physics objects can be used either as hurled weapons or mobile cover. From head-on the rudder like spine of the sentry guns gives them a very narrow hitbox, if you want to deal with them your best option is to knock them over with explosives or thrown objects.
You could make a run for it, past the sealed gate to cell block A5 and up the stairs on the far side to the top level. If you are fast enough the sentry guns can be bypassed completely, the way ahead does not require you to approach them. Though upon reaching the top floor it can be unclear which direction you need to go. So far throughout this level your route has been describing a series of circles, here however instead of continuing along the top level to the left to – completing the circle – you need to instead turn sharply to the right down a darkened corridor toward the warmly lit office at the end.
Just before the final flight of stairs to the top level are a pair of double doors, the corridor beyond collapsed. The windows to the side have been replaced with wooden planks, the spray-painted symbol indicating the presence of a Lambda Cache behind.
Your path through this initial portion of Nova Prospekt describes a series of circles. You work your way from the door into cell block A3, through the cells, corridors, and stairwells below to a doorway directly to the right of where you started. This navigational motif is repeated as you are side-tracked from the main path into the flooded utility spaces, and again as you ascend the final room avoiding the sentry guns to. An effective use of limited space, continuously being forced from the direct path serves to disorientate and confuse. By the time you reach the shower block it can already feel like Nova Prospekt is a vast and complicated structure simply because of the effort required to traverse what is a relatively short distance.