
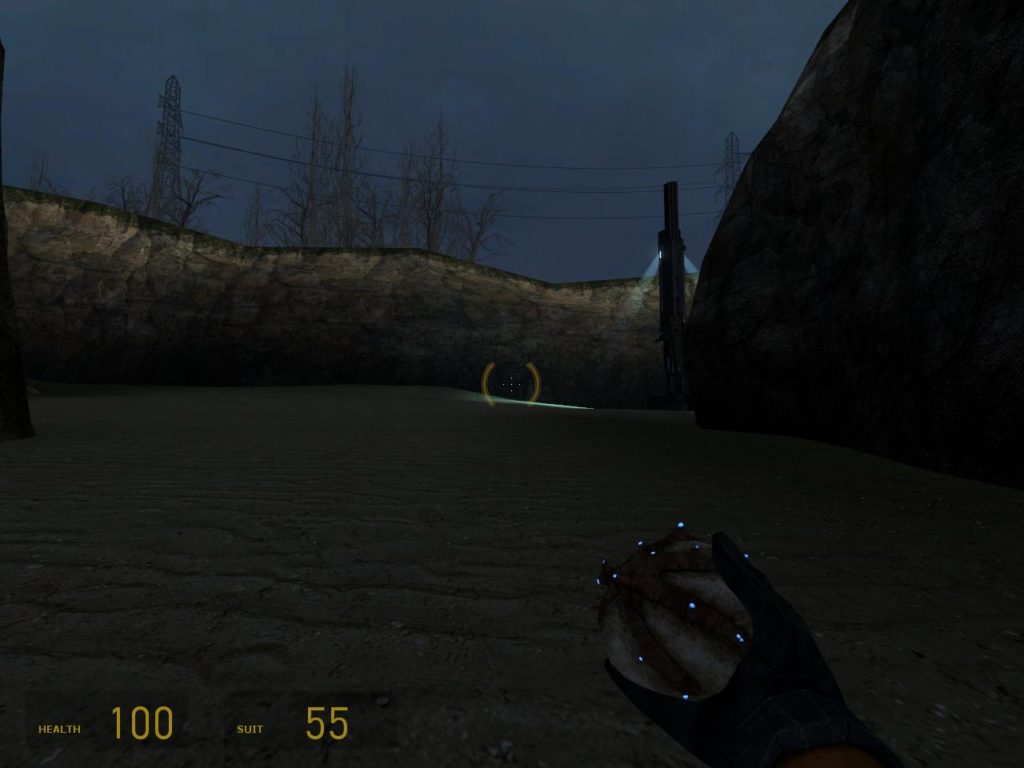
Having obtained the antlion pheromone pod – know colloquially as Bugbait – you leave the resistance camp with an entourage composed of a pair of docile antlions; an additional pair scurries down the cave to join you as you approach the beach.
Able to influence and direct the antlions, and with an endlessly replenishing supply, you can complete your assault across the beach below Nova Prospekt without ever firing a shot; or you can use them in conjunction with your own weapons to distract and flank the Combine forces.
Having spent the day progressing along Highway 17, the sun has started to set by the time you leave the cave, the sky a darkening blue. The beach leading to Nova Prospekt is abutted by cliff walls that are low enough for you to see the trees on the ground above, but still too high to scale. You need to progress along the beach until you reach the cliffs beneath the high prison walls, here a path up can be found.
The conclusion to the ‘Sandtraps’ chapter, the attack along the beach toward Nova Prospekt is reminiscent of the similar sequence from the opening of ‘The Silent Cartographer’ (Halo: Combat Evolved). Both of these draw influences from pre-existing cultural representations of the D-Day landing, though tilted through ninety degrees to become an assault along the beach rather than up it. A change in the tactical arrangement of space, this shifting of the line of advance also serves to position the water to one side of the player, and the cliffs to the other. Confining all combat encounters to a narrow channel with clear boundaries, ensuring player movement is easier to manage than it would be if attacking from the water with an expanse of beach to either side.
The beach is split into three sections divided by rock formations, each section protected by at least one Combine bunker. The size of the area watched over by each bunker, and the challenge presented by each encounter, escalates quickly. After the third and final bunker you have to push forward though the claustrophobic ruins of a half collapsed human structure before reaching the foot of the cliffs below Nova Prospekt.
The foes on the beach are almost exclusively Combine soldiers; only as you make your ascent up the cliff face do you encounter a scattered few zombies and headcrabs. With specific targets standing in relatively open spaces, and with a tendency to clump together, this beach assault makes a good playground for the experimenting with the use of your Bugbait. You can sit back and watch your antlions charge into the Combine’s defensive line.
“Priority warning, perimeter restrictors disengaged.”
The first sight that greets you upon leaving the cave is a pair of large anthill-like structures. Taller than you, almost as tall as the cliff walls surrounding them, their roughly conical structure is mirrored somewhat in the Thumpers that are station on the beach beyond. Both are symbolic of a connection between this area and the antlions, though for different reasons.
First encountered during your trip along Highway 17, the Thumpers are used to create an area of space through which antlions are unwilling to pass. Up until this point you have been trained to find a way to turn on any Thumpers you encounter so as to give yourself some safety from antlion attacks. Now, with antlion forces at your disposal your interaction with the Thumpers is reversed. You need to find a means of disabling them to allow your antlions to accompany you.
The first Thumper is positioned where the cliff walls close in to form a natural chokepoint. Approaching it the antlions with you will slow down unsettled by the radial vibrations being generated. By forcing you to move through a constricted space the reaction of the antlions is made obvious, without another way around their only option is to hang back. If you don’t initially realise the significance of the Thumpers they behaviour should indicator that something about the state of the world needs changing.
Once you climb the ladder to the Thumper’s upper platform and disable it, the voice of the Combine Overwatch can be heard broadcasting across the beach; the Combine know something has happened, though for the moment there are still two more Thumpers defending the beach.
Beyond the space protected by the first Thumper the beach opens up slightly, with a second Thumper several meters further on. This too will need to be deactivated if your antlions are to provide you with any support. Quiet until now but for the ambient soundscape, the music will rise into the mix once you deactivate the second Thumper; the fight begins in earnest.
The first two Thumpers are standing in relatively isolated sections of beach, one directly after the other. There is a larger gap between the second and third than between the first and second, this gap is protected by the first of three Combine bunker, positioned at the top of the beach.
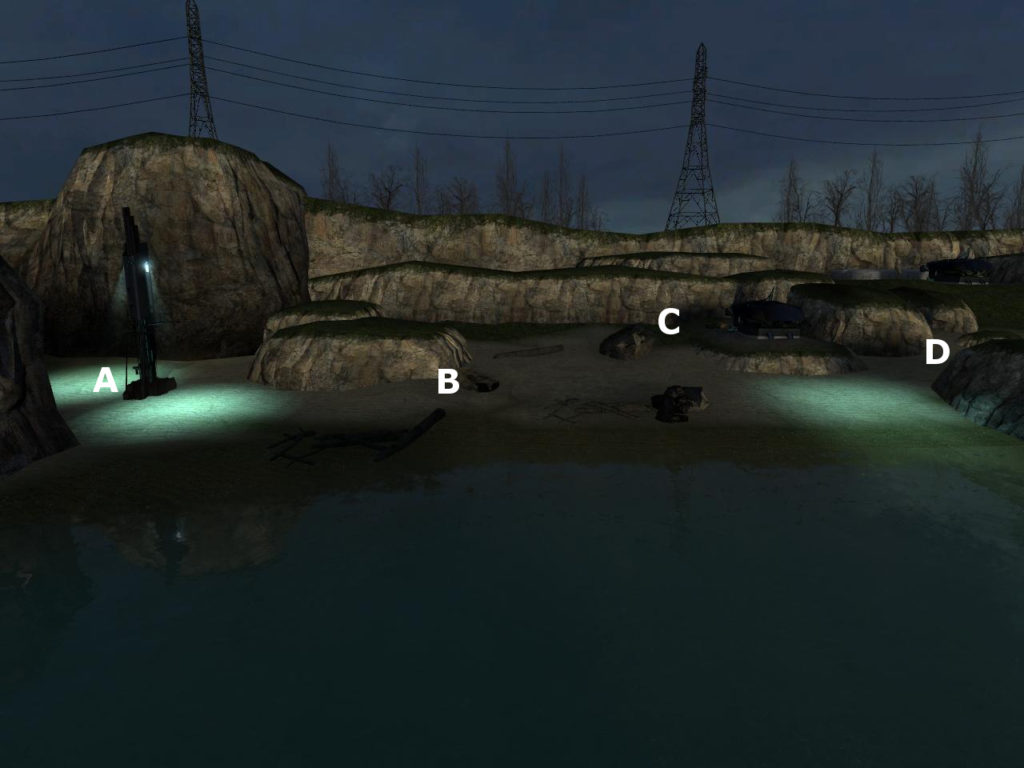
After deactivating the second Combine Thumper (A), the only way to proceed is to move forward along the beach. Upon reaching the small rocks (B), two pairs of Combine soldiers will emerge from behind a large rock (C). Each pair will move away from C; one towards the rocks above B, the other across the beach toward the cover offered by the smaller rocks near the shoreline.
From B the third and final Thumper is visible beyond the gap in the rocks ahead (D), though the Combine pair that moved down the beach upon your approach block any direct progress from B to D.
The Combine bunker beyond C is dark, there are no searchlights playing across the beach, the only point of differentiation is the patch of light at D created by the Thumper’s spotlights.
Moving forward from the second Thumper, a large low rock stands between the shoreline and the cliffs, it blocks a direct line-of-sight to the door at the rear of the bunker. As you move forward into the space ahead of the bunker a pair of Combine emerge from either side and move to flanking positions. Fortunately, the antlions under your command mean you should be able to deal with attacks from multiple directions simultaneously; unfortunately swapping between the Bugbait and your own weapons can prove awkward in the heat of battle.
The rocks (B) offer some protection from the Combine soldiers, and can be used to provide cover while you attack indirectly with grenades and Bugbait targeted antlions. When you do decide to move forward the positioning of this rock will push you to the right, away from the cliff wall and toward the shoreline, ensuring that you have to risk exposure to progress and can’t just head directly for the rear of the bunker.
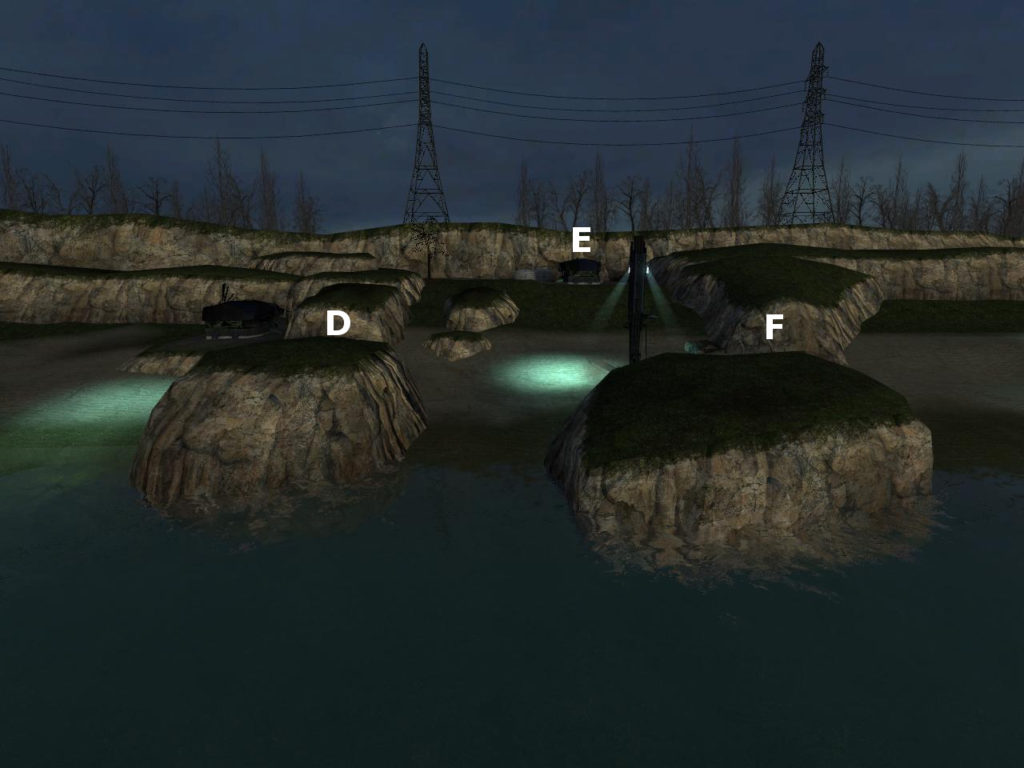
On through D, once again the way ahead (G) is visible. Heading directly to the Thumper will provoke fire from the second Combine bunker (E). The safe path is to head up the beach from D towards the cliffs and approach the bunker from this direction.
With the forces around the bunker dispatched, additional Combine soldiers will appear from further up the beach (F). Two pairs of Combine spreading out along the beach before advancing up the slope toward the bunker (E).
The next Combine bunker protects the area of beach where the third and final Thumper stands. The search lights from the bunker sweeping the beach and providing an indication of where the Mounted Gun within is trained. This weapon is much more effective than the Combine soldiers themselves at killing antlions; this makes sense given they are the primary threat likely to be approaching from this direction. Although you can direct your antlions into the bunker’s line of fire to keep the Combine distracted, you can’t rely on them to do all the work for you this time. You will need to move forward yourself if you are to safely lead them away from the killing grounds into a position from which they can attack the Combine behind and within the bunker. If you keep close to the rocks on your left (D) there is a path up the beach to the cliff wall. Taking this route lets you guide your antlions toward the rear of the bunker without triggering an attack. Even if you do not take this path yourself it is there to enable the antlions to reach the top of the beach, they will not approach the Thumper directly until it has been deactivated.
Instead of a scripted attack by Combine soldiers to block your path or draw your attention, this encounter guides you in two complementary ways. The Thumper must be deactivated if you are to bring your antlion forces with you, but this is not possible while there are Combine still inside the bunker. In design terms this is a form of “forcing function”: you cannot complete Task A (shutdown the Thumper) until you have completed Task B (kill the Combine inside the bunker). Therefore, the game can be certain that once Task A has been completed Task B has also been completed; you are forced to complete Task B even if it is not your actual goal.
The Combine bunker has been erected abutting an older concrete structure which appears to have survived from a previous era, likely World War 2. The precise location of City 17 is never given – though architecture and signage suggest that it is somewhere in Eastern Europe – so what stretch of water these original bunkers may have guarded, and from what threats, is never explored. That City 17 exists somewhere near the Baltic would make the most sense geographically.
As you attack this Combine bunker the forces within will sound an alarm, though this can be silenced by a switch inside the damage has been done. More Combine are on their way.
Inside the bunker is a Mounted Gun that is identical to the ones you will have first encountered as you headed out of City 17 during the ‘Route Kanal’ chapter. Two pairs of Combine will attack from further up the beach, approaching through the chokepoint formed by the rocks near the shore (F). They will branch off to either side of the Thumper before attempting their approach, making themselves easy targets for the Mounted Gun.
With the Thumper still active the antlions will be unwilling to attack the advancing Combine until they have moved off the sand. You will need to deal with them yourself.
By being forced to clear the bunker before you can deactivate the Thumper, the game can be sure that once you leave this section of beach there are no remaining Combine soldiers behind you.
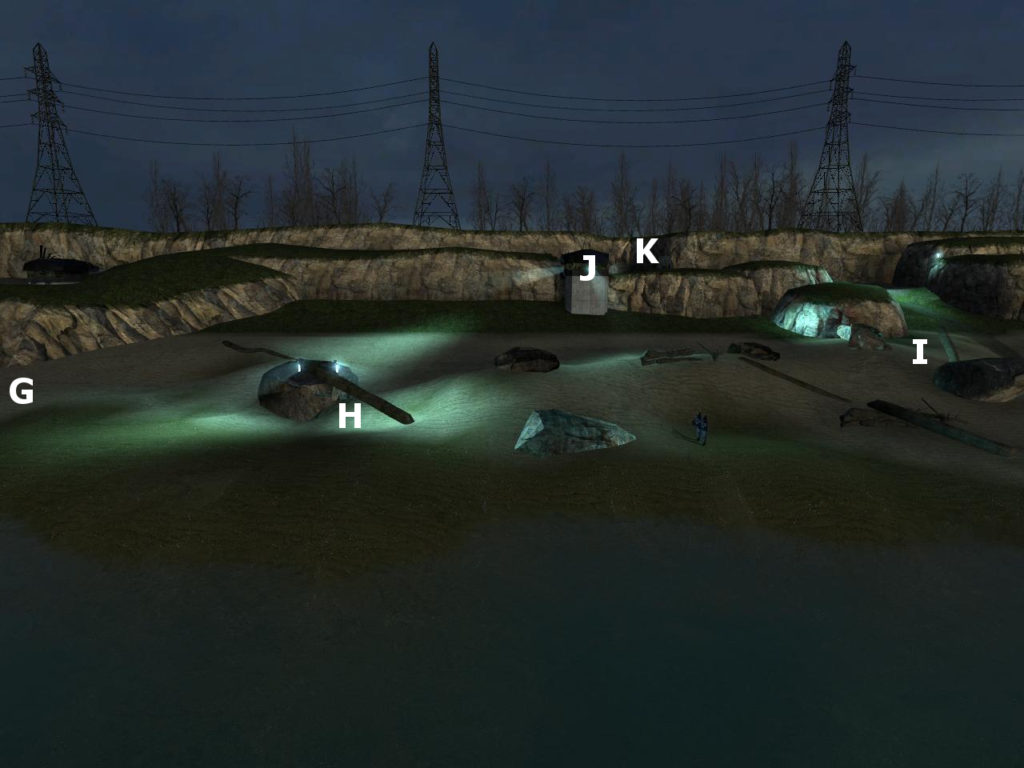
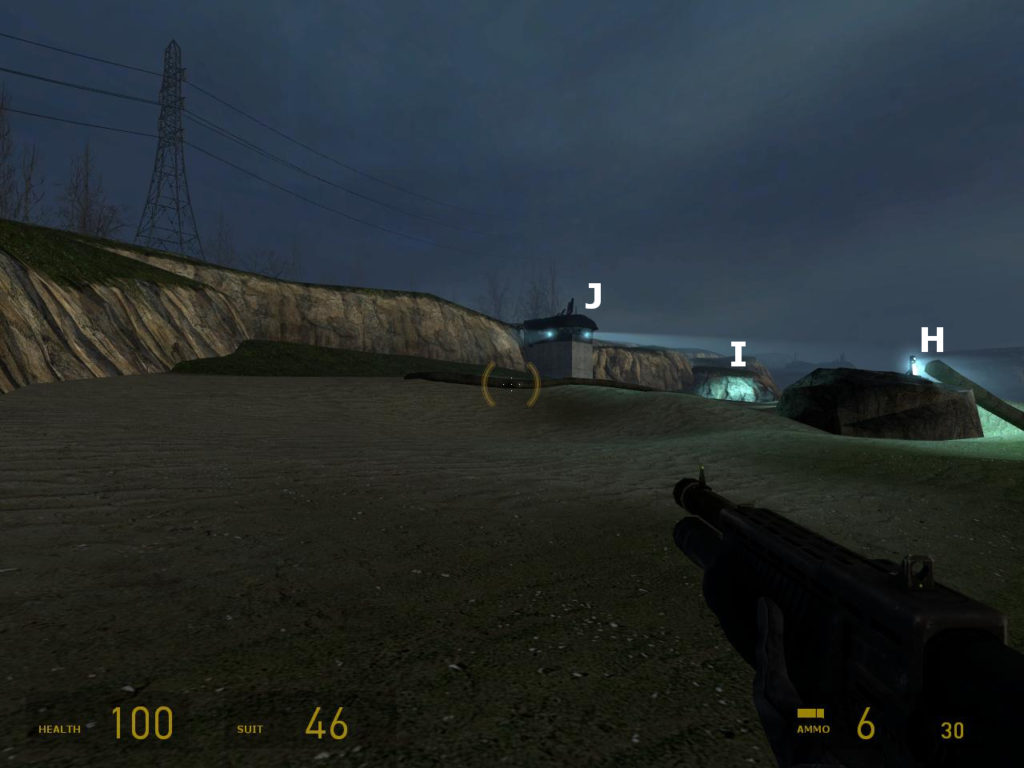
Beyond G is the third and final beach encounter. The only available cover from the Combine bunker (J) is offered by the rocks ahead of you (H). From this position you will come under attack from a pair of Combine soldiers further along the beach.
The only way to reach the Combine bunker is to advance across the beach to I and take the path up and around to attack it from the far side. Upon reaching I, three Combine soldiers will move down the path toward you. Once these have been dealt with the route to J is clear. The trio of Combine soldiers within the only forces left in this encounter.
Now, finally off the sand, the way ahead lies through the doorway into the darkened interior of the crumbling structure (K).
Once more Combine bunker protects the area ahead. This one stands atop a concrete platform, higher than the others and no longer directly accessible from the beach. Within are a trio of Mounted Guns, together able to cover a hundred and eighty degrees sweep of the beach in front of the bunker. This spatial layout forces you away from the tactics used to deal with the previous bunkers. There is no safe path for you to lead the antlions along to reach the bunker, you must move through the killing field directly ahead of it.
Moving forward, the rocks and driftwood on the shore provide isolated points of cover from the bunker to your left. Scattered Combine forces have taken up positions on the beach they will use their weapons and grenades to attempt to flush you out of hiding. Antlions can be used to deal with the Combine on the beach. You will need to be careful as the highest cover is close to the shore, and antlions cannot swim; they will in fact die when exposed to water. Fortunately, as new antlions appear to replace those lost, you can eventually win out against the Combine on the beach through sheer attrition.
Initially there are two pairs of Combine soldiers on the beach. The first are waiting in the rocks close to the shore (H). With them in front of you, and the incoming fire from the Combine bunker to your left, it’s easy to get pinned down here. Grenades can turn the tables, flushing the Combine into the open; alternately Bugbait will fix them in place and allow your antlions to deal with them. The second pair of Combine are waiting further ahead, behind cover at the far end of the beach (beyond I). This second pair serve primarily as a soft barrier and can mostly be ignored. They don’t directly block your progress, but their presence serves to disincentive proceeding in that direction, especially as an alternate path is available. If this soft barrier doesn’t work to push you toward the correct route, a more explicit barrier is presented by the rock wall at the end of the beach, and the multiple Combine bunkers overlooking it.
As you reach the break in the cliff walls (I), and start to make your way up the path, three Combine soldiers will rush to engage you. At least one of them is armed with a shotgun. At such close range this Combine soldier presents the greatest immediate threat.
- In the original release of Half-Life 2 you had to be mindful of the silhouette of each Combine soldier in order to differentiate them. A change was made for the release of Half-Life 2: Episode 2 whereby differently armed Combine were given different coloured eyes. Eyes glowing red the Combine soldiers armed with shotguns are now instantly recognisable even in darkness, allowing you to prioritise your attacks as necessary. The majority of the Combine forces in Nova Prospekt are armed with SMGs or Overwatch Pulse Rifles, and can be identified by their yellow eyes.
With these three Combine soldiers dispatched it is time to deal with the remaining forces inside the bunker. Each of the three Mounted Guns is operated by a single Combine soldier, though some may leave their position as you approach. The rear door of the bunker makes an inviting target for a thrown Bugbait pod, and in such a confined space the antlions will make short work of those inside; a grenade will have a similar effect.
Through the doorway in the rock (K) is a grid of small square rooms dotted with explosive barrels. Metal fences and collapsed walls serve to block a direct route through the space. Combine soldiers will push in from the far end as you make your way through.
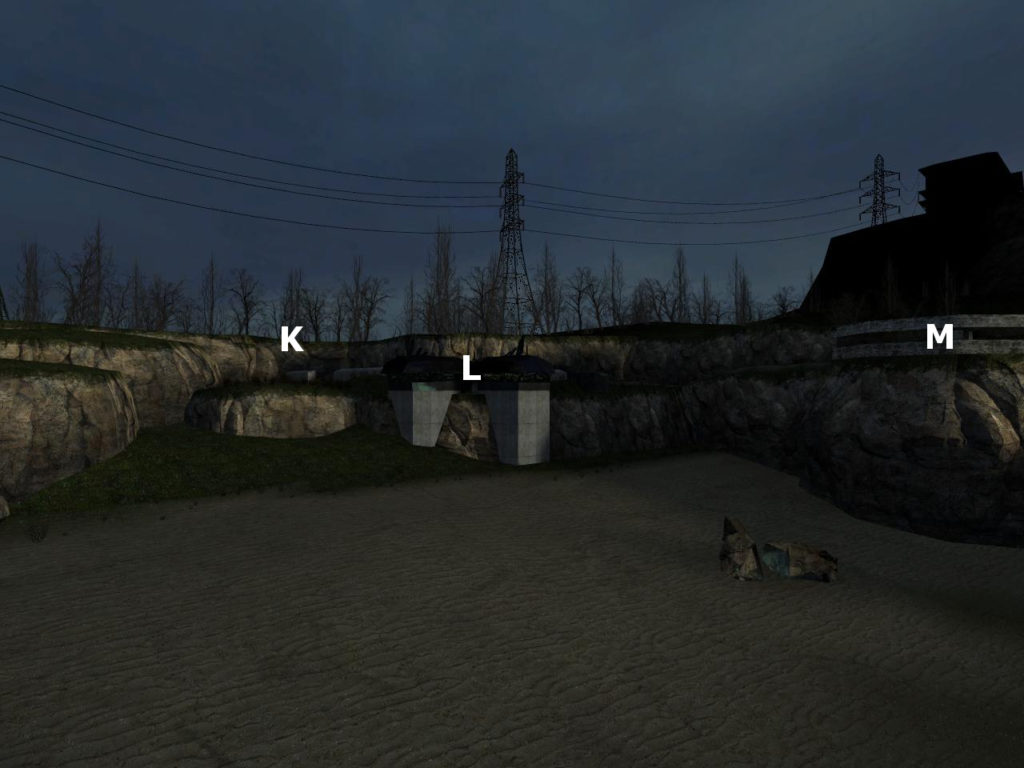
Out the other side, you will be on a pathway several meters above the beach. Following the path around to the right leads to two Combine bunkers overlooking the beach below (L).
The path curves up and to the right though the human built bunkers upon which the Combine structures have been grafted (M). As you approach two Combine soldiers will move to intercept you. A third operates the Mounted Gun within the bunker. Pushing forward around the curve in the path you take you out of this weapon’s firing arc.
Built on a corner the concrete bunker (M) extends around to the left with another entrance out on to the open space at the foot of the cliffs below Nova Prospekt itself.
At the top of the beach behind the Combine bunker is a tiered circular depression. Constructed from concrete it looks like it might once have been a coastal gun emplacement – its design is similar to those seen in northern Europe during World War 2. Along the cliffs above the beach are a number of other structures that, from their design and materials, appear to be from the same era.
A darkened doorway leads into a bunker cut through the cliff (K). Its position and design suggest it once served as an ammunition depot for the nearby costal gun. Now it stands abandoned, holes blasted in the roof, masonry littering the floor. Blocked first by a section of collapsed roof, then beyond that by a rusted metal fence, the main corridor once formed a straight line from one entrance to the other. With this route blocked, you are forced into the warren of interconnected rooms branching off to the left. The asymmetrical layout, abundance of debris, and limited light sources combine to create a confusing network of square concrete spaces with multiple exits, and no clear path to follow.
Two Manhacks will burst, buzzing, from the darkness as you round the first corner.
- Small flying drones, Manhacks are by propelled by a trio of centrally mounted rotor blades that also serve as their only means of attack. They can be destroyed with gunfire, though grabbing them out of the air with the Gravity Gun and smashing them against a hard surface is the more efficient way to deal with them. While holding one with the Gravity Gun you can also use the whirling rotors to damage any enemies in melee range. Low damage attacks combined with an unpredictable movement pattern make Manhacks a good means of harassing the player without providing a genuine threat.
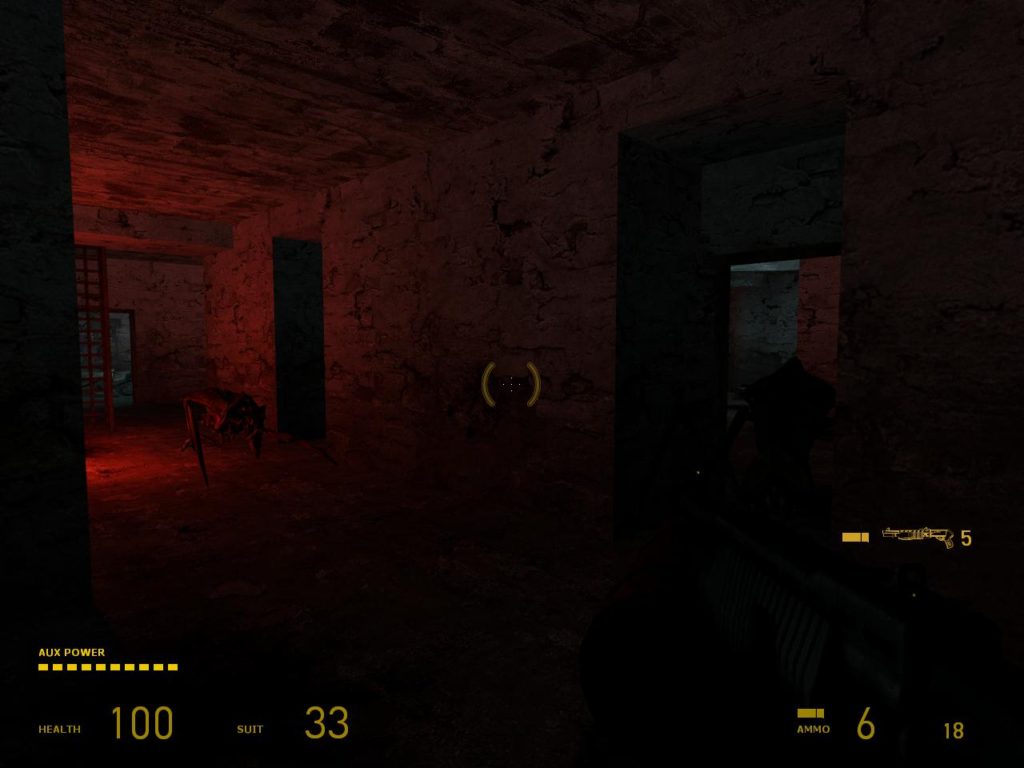
With limited room to move combat here is claustrophobic and messy. The Combine soldiers throw out flares ahead of their advance, casting the graffiti cover walls in a violent red glow. Small stockpiles of explosive barrels sit against the walls where they are easily hit with stray – or intentional – bullets. Each of these clusters of barrels are so close together that the explosion of one will ignite the others.
This fight foreshadows a similar encounter during ‘Entanglement’ where, within the bowls of Nova Prospekt, the Combine cut the power and attack you and Alyx from the darkness; their positions initially only visible by their glowing eyes.
All rooms eventually lead to a large interior space with one way in and one way out. Here the roof has completely fallen in leaving a pile of rubble in the middle of the floor. The exit from this bunker is through the door in the right-hand wall. Beyond, a short hallway extends to the left out onto a path clinging to the rocks above the beach.
Before reaching this final room, there is a small opening in the wall to the left. Obscured behind a barrel it is not strictly a Lambda Cache (secret stockpiles of the resistance forces from Black Mesa East, marked by a yellow lambda symbol), despite its partially hidden nature and the pair of supply crates within.
A low concrete wall runs along the right-hand side of the path, channelling you forward while preventing you falling over the edge to the beach below. Such a fall won’t always be fatal, but it will take time to get back up here again.
This wall connects to a larger concrete structure which has been augmented by a pair of Combine bunkers. Positioned at right angles to each other, they form a corner overlooking the beach. Only one of their entrances is visible from here, the Combine soldier operating the gun emplacement within will react to your approach, turning to engage you. The other bunker is empty.
Visible further along the path is a second, larger, concrete structure (M). The Combine solider operating the gun emplacement here can target this stretch of path, so you’ll need to close the distance to escape its field-of-fire. If you are able to kill him from a distance he will take a dramatic tumble through the window. The path itself continues further along the beach, parallel to the water, before curving up and to the right to reach the entrance to this WW2-era bunker. Two Combine soldiers will emerge to meet you, firing Pulse Rifles and throwing grenades to cover their advance. The concreate walls along the cliff edge offer cover, and are low enough that you can hurl Bugbait ahead of you to have your antlions deal with the Combine while you remain safe.
With the Combine on the path dealt with – and assuming you haven’t already killed the gunner – it’s possible you will hear the remaining soldier issue the radio warning: “Outbreak! Outbreak!” This is the signal that they are the lone surviving member of their squad, and an indication that the current combat encounter is nearly over.
Along this part of the path the WW2-era structures are at their most intact, the Combine have simply repurposed these coastal bunkers for their own use. Occupying an entire exterior corner, the bunker’s windows overlook everything from the beach, to the open space at the foot of the cliffs below Nova Prospekt.
- Compared to the first Half-Life, the manner by which the Combine forces vocalise their behaviour is a case where clarity was sacrificing for narrative. That the Combine view aberrant behaviour as a disease provides an insight into their belief system, and adds to the narrative contextualisation of the world. This comes at the expense of clarity of intent, it’s difficult to translate these cryptic barks into expected behaviours. Does that voice line mean the Combine have lost sight of me, or that they know exactly where I am? When it comes to combat AI, perception is important, enemies that communicate their thought processes appear intelligent. Players, in turn, will feel rewarded when they are able to use those behavioural cues to out-smart the AI.
Across a stretch of grass are the cliffs, and the looming outline of Nova Prospekt atop them. Framed initially by the long rectangular windows of the bunker, then by the doorway itself, this is what Valve’s designers refer to as a “vista”. A visual reward for reaching this part of the level, it also serves a similar function to an establishing shot, providing an overview of what is to come; context for the coming fight. The vista is arranged under the assumption that you are coming through the door looking straight ahead. This is reasonable as there is no current threat so all your attention should be focused toward the direction you are moving.
Cutting through the centre of your vision – in what is almost a straight line – the white of the low cliffs in the middle distance lead our eyes across the space to the large metal pipes rising perpendicular to the ground. Attached to the side of the cliff upon which Nova Prospekt stands, these pipes point straight up toward it. At the intersection of these two strong visual lines is a Combine Dropship. Semi-organic flying craft, these are used to deploy groups of Combine soldiers. A dynamic element associated with combat, this will serve to further draw your attention, complementing the lines in the environment. The dynamic element indicates your immediate threat, the static elements your overarching goal. Reaching the place where the Dropship has landed is your current objective, while getting to the top of the cliffs is your long-term goal.
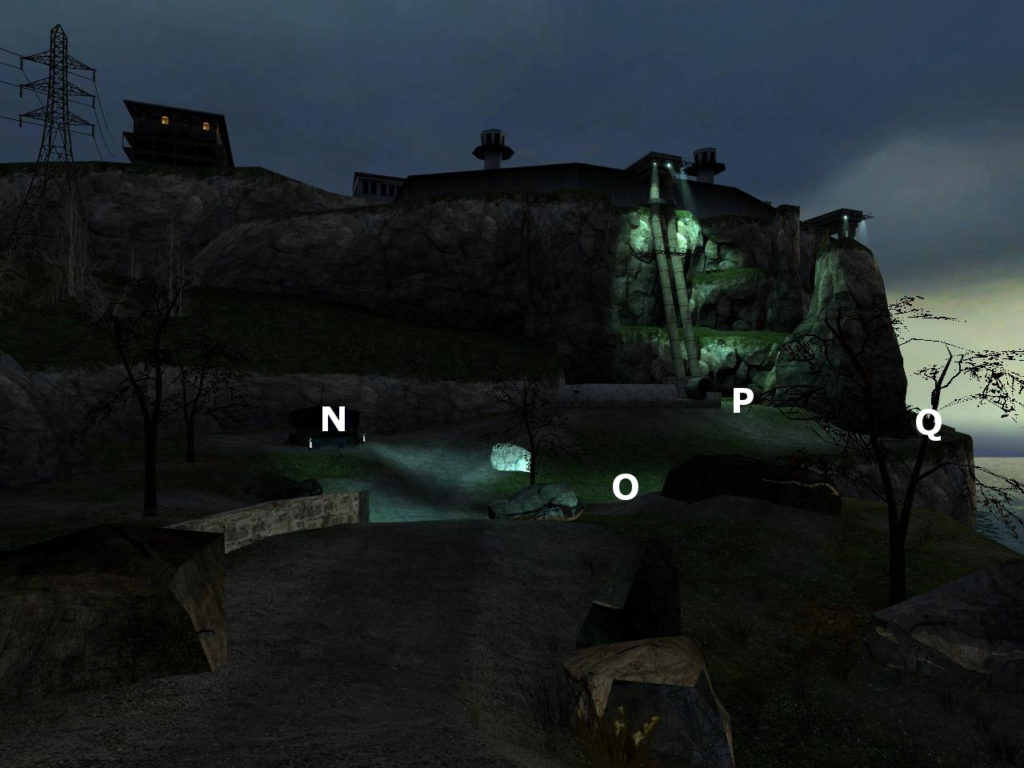
Leaving the bunker (M) the space between you and the cliffs is initially empty. As you move forward four Combine soldiers will charge from the Combine Dropship at the foot of the cliffs (P), one will make for the Combine bunker (N) while the others move across the open area towards the trees and rocks (O).
The Combine Dropship will depart before you can reach it, leaving the area at the foot of the cliffs empty (P). The way into Nova Prospekt is to be found high above, in order to reach it you will need to take the path along the cliff edge (Q).
The remains of another concrete structure stand at the foot of the cliffs where the Combine Dropship has landed. Its roof is missing entirely, and the remaining walls give little indication what purpose it once served. Four Combine soldiers emerge through the doorway in what is left of the concrete walls. Three will spread out and advance on you. The fourth will head across your line of sight, making for the Combine bunker (N) directly in-line with the doorway through which you enter this area. If able to reach the Mounted Gun within he will present a threat. You initiate this first wave of Combine by passing through an invisible trigger, the position of which is such that if you sprint directly ahead to the bunker you can beat the Combine soldier to it.
Threats from multiple directions, and no easy way to deal with them separately, this encounter encourages you to make effective use of your antlions. During the proceeding fights you always had the option of hanging back and letting them do the fighting. Attempting that here will prove much harder. The physical separation of the two threats (the Combine in the bunker, and the Combine soldiers out in the open) mean your antlions can only deal with one at a time. You either have to split your attention, sending them in one direction while you focus on the other. Or act in unison to overwhelm one threat quickly before turning your attention to the other, hoping you don’t take too much damage from whichever force you initially leave unopposed.
Rushing directly at the Combine bunker is risky, but the threat it presents is probably the greatest, so dealing with it first makes sense. Once you have secured it you can turn the Mounted Gun on the remaining Combine soldiers.
If you move to attack the Combine soldiers in the open, the rocks, trees, and remnants of buildings strewn across the space (O) will offer protection to both you and them. The size of the area, and the way the soldiers spread out, make it impossible to keep all of them within your field-of-view. You can either try to outflank them with your antlions – while hoping you don’t take damage from the Combine Mounted Gun – or use the cover to your advantage, isolating and eliminating individual soldiers without exposing yourself.
The Combine Dropship is not directly deploying any of these soldiers; instead this encounter has been designed so that each of the four Combine in the initial wave will be replaced. Killing one will trigger another to run from behind the concrete walls to join the attack. Depending on how quickly you deal with the initial four Combine, this can lead to either a drawn-out trickle of reinforcements, or a staggered sequence of waves. In total, you will encounter a maximum of eight Combine here, and never more than four at once. If you run toward the Dropship’s landing site until you can see through the doorway in the ruined wall, the spawning behaviour will be cancelled, and you will only have to deal with the Combine that are already present; this prevents you from witnessing them spawning in.
The Dropship itself will fly away as you approach, it’s landing site offering a brief moment of calm. Nova Prospekt itself is finally in sight. It’s time to find a way inside.
The mouth of the large pipe at the foot of the cliff – where the twin pipes running down from above reach the ground – initially looks inviting, though the metal grate over the entrance is immovable.
Contrasting in shape and colour with both the rocks around it and the water beyond, the half collapsed wooden fence along the cliff edge stands out. This is the way forward, a path curving behind the rocks and out of sight.
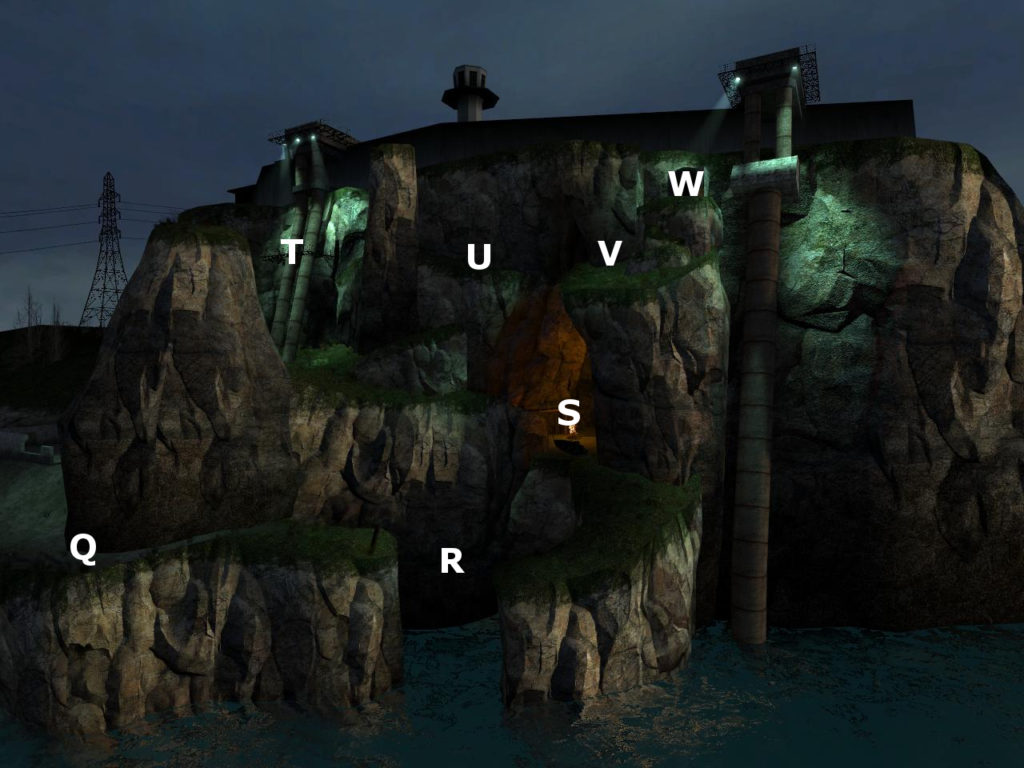
Around the corner is a break in the path (R), here an old wooden post juts out at an angle over the gap, and you can use this to get across. Keep moving along the path and you find yourself in a sheltered niche, here a small fire smoulders next to the remains of a wooden boat (S).
The path continues above you. Destroying the wooden beams supporting the platform against the cliff face will cause one end to drop to the ground, creating a ramp.
Two Combine soldiers have taken position on the gantry half way up the pipes (T), they will open fire once they can see you. On the far side of the pipes a ladder leads up to this gantry, from here you will need to jump back onto the cliff path again (U).
Another gap in the path (above S) needs to be traversed before you can climb up the rock steps (V), to the open pipe above (W). As you reach the top a Fast Zombie will spring from the mouth of the pipe (W), darting right at you. Beyond him the pipe extends underneath the walls and into the prison yard.
Initially hidden from view around the corner, a break in the path requires you to use one of the remaining fence posts, now jutting from the floor at an angle, to leap across the gap. This is an explicit break in the continuity of the level so far, a one-way obstacle that reinforces that backtracking is unnecessary. In actuality you can fall back down here from a higher part of the path, but this is liable to cause substantial damage, if not be outright fatal.
This concept of the one-way obstacle that enforces forward progression while preventing backtracking, is one that will be used several more times throughout Nova Prospekt. It usually appears in a similar form; a drop from a height that is low enough to avoid injury but high enough to ensure that you can’t climb back up. Another version that will be seen later, is the moment where the ceiling collapses behind you sealing off the way you came. In games with less explicit level transitions it’s a good way to ensure certain portions of a map can be unloaded safely from memory, as players will be unable to ever return to areas on the other side of the “drop”.
Even before you reach the break in the path, orange lighting from a fire ahead is visible; another contrasting visual element that serves to draw your attention. A natural cleft in the cliff protects the fire from the elements. The remains of a wooden boat lie next to it (S), while ahead, slumped against the cliff beneath a wooden platform, are a pair of Zombies. Initially sedate, they will stagger to their feet and attack if approached. Between them is a small red petrol can, which will explode when shot, igniting the Zombies.
Ahead, closer to the fire, are the charred remains of a human body. The backstory of what happened here is intriguing, if difficult to parse. Did three people come up here to hide only to be attacked by headcrabs, forcing them to kill and burn one of their own before they too succumbed? One of the incidental historical details of this world is that during the early years of Combine rule the oceans were drained, causing a global drop in sea levels. This spot appears to be far above the high-tide mark, but the boat may have beached here years earlier when the sea level was much higher. If that is supposed to be the case it doesn’t fit with the human structures on the beach, which would have been underwater if the sea level had ever been that high. There are no answers, just questions and a creepy tableau.
To carry on you need to find a way up. The wooden platform above the Zombies is supported by a pair of posts. Akin to the classic “Hanna-Barbara effect” the different colour and material of the two supports distinguishes them from the platform, marking them out as functional. In addition to this visual differentiation their placement next to a threat – the Zombies – makes it likely that stray gunfire will hit one or both of them. Their reaction when under fire is to move, splinter, and finally break. These elements in combination inform you that shooting these wooden supports will have an effect on the environment. In this case destroying them and dropping one end of the platform to the ground to create a ramp.
Up this ramp and back onto the rocks, the path rises in a curve back toward the beach. Around the corner, and you are bathed in light from powerful spotlights above. Their beams angled down toward the twin pipes climbing the cliff face ahead of you. Immediately you will begin to receiving incoming weapons fire from higher up the cliff. The natural reaction to taking damage is to try and identify where it is coming from, by positioning the two Combine soldiers on an elevated position this encourages you to look up toward them, drawing your eye to the gantry which is you next goal. To reach it you will need to use the ladder on the far side of the pipes.
A third Combine soldier on the gantry at the very top of the cliffs will shoot down at you as you reach the top of the ladder. Again, this incoming fire encourages you to look up, reinforcing this as the direction you need to be paying attention to, the way you should be heading.
In order to keep moving up you will need to double back on yourself and jump from the gantry to a new section of the path. This might seem counterintuitive, but every stage of your ascent has been built on this zig-zag pattern of working your way across and up the cliff face. Two supply crates are sitting on the rocks at the start of this section of path, further encouragement to explore in this direction.
- Smaller than standard crates, and marked with a black on yellow logo, supply crates are the primarily means of acquiring ammunition throughout Half-Life 2. With a few exceptions the content of each supply crate is dynamically determined based on the player’s current status. If they are low on ammunition the crates are more likely to contain some, while players low on health will find health kits within instead. This algorithmic allocation of resources serves to smooth over the most dramatic difficulty spikes by providing what the player needs when they need it. It can, however, cause a flattening of the dramatic curve of an encounter and the elimination of partial-failure states. If you struggle through a fight and only succeed by using all your ammunition the next supply crate you find will always grant you some, preventing frustration at the cost of minimising the edge case scenarios that can often be the most memorable.
Ahead is another gap in the path, this one above the campfire where you encountered the two Zombies. On the far side of this final gap the path ends. The rocks here (V) can be used as steps to reach the ledge above where an overflow pipe opens onto the cliff face.
This space could have been designed to let you simply walk a path up the cliff face to reach the pipe. Instead the need to jump gaps, deal with threats, and find a route up irregular rock steps, provides a sensation of having scaled the cliff face instead of simply following the route provided.
Just before you reach the final ledge there is a scream from the darkness of the overflow pipe, a Fast Zombie will bound out to attack you. It will have been several hours since your last encounter with a Fast Zombie, the sudden appearance of one here is disruptive, potentially causing you to stumble on the rocks, or in some cases leading you to back right off the cliff to your death. It’s a classic jump scare, something Half-Life 2 uses sparingly to disrupt the pacing of encounters.
Past the Fast Zombie the open pipe leads under the walls above and through a level transition into the overflow drains beneath the prison yard.
2 replies on “Groping The Map: Nova Prospekt – Beach”
Reeeeeeeeeeeeeeeeeeeeeeeeeeeeeeeeeeeeeeeeeeeeeeeeeeeeeeeeeeeeeeeeeeeeeeeeeeeeeeeeeeeeeeeeeeeeeeeeeeeeeeeeeeeeeeeeeeeeeeeeeeeeeeeeeeeeeeeeeeeeeeeeeeeeeeeeeeeeeeeeeeeeeeeeeeeeeeee
I said as I fell down into the water as I was pushed down by the zombie.
Yup, there’s a fast zombie waiting for you once you reached the top of the mountains, its in a tube. It charged at me and pushed me off the cliff. Get your shotgun ready!